Batman
03 Nov 17:00Duty six : Green
| Start | Time | Activity | Requirements | Instructions | Scouter | ||||||||||||||||
|---|---|---|---|---|---|---|---|---|---|---|---|---|---|---|---|---|---|---|---|---|---|
| Batman uses a lot of gadgets and tools to help him be a superhero. He has a team of people who build the gadgets for him | |||||||||||||||||||||
| 03 Nov 17:00 | 5 | Activities : Opening |
Register, beans, flag, totem and skin |
Grand Howl Flag Break Register Inspection - belts and shoes |
Akela | ||||||||||||||||
| Could you make gadgets for batman? You would first need to know how to use some tools | |||||||||||||||||||||
| 03 Nov 17:05 | 10 | Game : Find the Tools | Scatter a variety of tools (or pictures of tools) around the play area. Cubs to search for and bring back the tools and place on a prepared board/sheet of cardboard where the outline of the tools have been drawn. Once all the outlines have been filled, the game is done. End with a discussion on each tool and how to look after them (Repairs badge requirement to know any four tools). Use screwdriver, vice, hammer, wood plane, brace and bit, pliers, adjustable wrench, saw, g-clamp | Akela | |||||||||||||||||
| Different glues work for different projects. What should we use to fix these things? | |||||||||||||||||||||
| 03 Nov 17:15 | 20 | Activities : Simple repairs | Various items requiring minor repair | Using glue, repair the item. Use clamps to hold together until glue dries (or other ways of holding together). Use toothpick to apply glue neatly. | Akela | ||||||||||||||||
| Good job!! Take a break | |||||||||||||||||||||
| 03 Nov 17:35 | 5 | Activities : Juice and biscuits |
Juice and biscuit break |
Akela | |||||||||||||||||
| Batman needs his sleep but a leaky tap is keeping him awake | |||||||||||||||||||||
| 03 Nov 17:40 | 15 | Activities : Repair a leaky tap |
tap, shifting spanner, washer, cloth |
Before you get startedIf you are in any doubt about the technique for repairing a tap, it is best to seek professional help. To fix a leaking tap, first, you must safely turn off the water supply to that tap. This is easiest when isolation valves are situated close to the tap, on its supply pipes. With the valve design shown in this guide, if the slot of the screw is aligned with the pipe, thenthe valve is on. A quarter turn of the screw, so that the slot is running across the pipe, will turn the valve off. You can normally identify whether a tap uses rubber washers or ceramic discs by turning the tap handle. If it can only rotate a quarter or half a turn, it will normally be a ceramic disc type tap. If it rotates more than this, it will generally be a rubber washer type. Some single-lever operated mixer taps have a ceramic cartridge that is often very specific to a particular manufacturer. Replacements may need to be specially ordered. With ceramic disc taps, you replace the whole valve. With rubber washer taps, you only need to replace the small washer. Worn O-rings are a common cause of leakage on kitchen taps, but you may also find O-rings on the valve body in some taps. If you fix a washer and the tap is still leaking, check for other O-rings and seals on the valve body to see if they are worn. Protect rubber washers by taking care when turning taps off and on. Most become worn and need replacing because the tap has been overtightened when turning it off. A tap with a compression valve and rubber washers will always drip once or twice when you turn it off – it is not necessary to tighten and tighten again to avoid this. Allow these residual drips without feeling the need to tighten the tap more. Gain access to the tap body 1 Before working on a tap, turn off the water supply – easiest when isolation valves are located close to the tap. Run tap to remove water from the pipes.  2 To get the tap head off, you need to access the handle screw. This will often be hidden under a cap on the handle, which will be simple to unscrew.  3 Alternatively, the top cap of the tap may be flipped off using a slot-head screwdriver. Carefully push under the cap edge and ease off.  4 Another possibility may be to simply lift off the cap with your fingers. Tap designs vary, as do these access points. Some may even require an Allen key.  5 For single-lever taps, it is often necessary to flip off the hot and cold indicator tab with a slot-head screwdriver to reveal a tiny retaining screw. Be careful not to scratch the chrome finish of the tap.  6 Any parts that you take off, lay out in order for easy reassembly. This ceramic cartridge can be replaced with an adjustable spanner in a similar way to the ceramic disc valve replacement shown opposite. Replace a rubber washer 1 Remove the handle cap if there is one, to expose the handle screw, and unscrew it to remove the handle.  2 Set aside the tap handle, along with the shroud if there is one, to reveal the tap valve underneath.  3 Use an adjustable spanner to unscrew the tap valve so that you can remove the valve from the tap seat.  4 Unscrew or flip off the washer and replace with another. Reverse the process to reassemble the tap. |
Akela | ||||||||||||||||
| The bat signal is a big light that needs to be plugged in. But the plug has come loose so we need to repair it. | |||||||||||||||||||||
| 03 Nov 17:55 | 20 | Activities : Wiring a Plug | plugs, wires, cutters, screwdrivers, instructions |
Wiring a Plug
|
Akela | ||||||||||||||||
| Lets make our own Batman weapon to use against the baddies | |||||||||||||||||||||
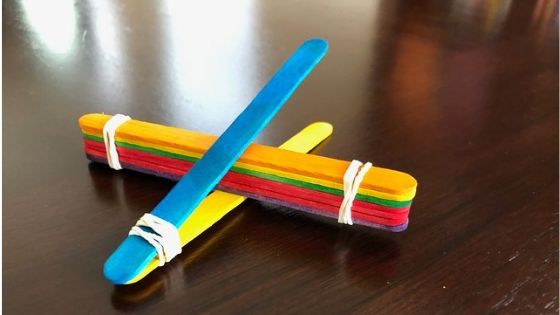
| 03 Nov 18:15 | 10 | Activities : Catapult |
Popsicle sticks (or craft sticks) (9 each) Rubber bands (5 each) Plastic Spoon (1 each) Styrofoam Balls (or Pom Poms or marshmallows or anything that fits in the spoon)
|
1. Make a stack of 7 popsicle sticks and use rubber bands to tie them together on both ends. 2. Make a stack of 2 popsicle sticks and use a rubber band to tie them together on one end only. 3. Pull the 2 popsicle sticks apart and wedge the stack of 7 popsicle sticks between them.
4. Use two rubber bands, secure the plastic soon to the upper popsicle stick. 5. Place the ball onto the spoon. 6. Hold the catapult with one hand, use the other hand to push down the spoon. 7. Release the spoon and watch the ball fly! |
Akela | ||||||||||||||||
| We are saying goodbye to Lisy who is going up to Scouts this week. | |||||||||||||||||||||
| 03 Nov 18:25 | 5 | Activities : Closing |
Totem, Skin Badges, certificates |
Announcements Badge handouts Grand Howl Flag Down Prayer Dismiss |
Akela | ||||||||||||||||


Programme prepared on 01 Aug 00:34