African Drum
| Category | Activities |
| Time to allocate (mins) | |
| Outcome | Make a musical instrument and play it |
| Resources | Cardboard Core/Tube (we are using project board) Roll of 5cm wide clear tape (packing tape works great) Glue stick Roll of duct tape or electrical tape Two thick wooden skewers Wine bottle cork Scissors Craft knife with cutting mat Pencil Ruler Some paint and a paintbrush - printed patterns can also be used instead |
| Instructions | NOTE ON CARDBOARD TUBE (CORES) We used one that was 21cm (8″) in diameter by 18.5cm (7″) tall. But you can use whatever size you want. You can find concrete forms or tubes at your local hardware store that work great. Packing tubes from the post office are another fantastic option, they are smaller, but you can get lots of different sizes to make a drum set. Another place to check is a local carpet shop. The carpet shops in South Africa have empties all the time. Another idea is to use an empty plastic or metal 5litre container or pail, but the bottom of the container needs to be cut out. Directions for Making the Drum If you have purchased packing tubes, they may be extra long. You will want to cut the tubes so they are slightly taller than they are wide. Project board can be cut and stapled into tubes instead. Once the drum cores are ready, it is time for the Cubs to get to work making drums! Make the Top of the Drum Stick the beginning of the clear (cello) tape about 3cm down onto the side of the drum, stretch the tape across the top of the cardboard tube as hard as you can and stick it down 3cm on the opposite side of the drum. 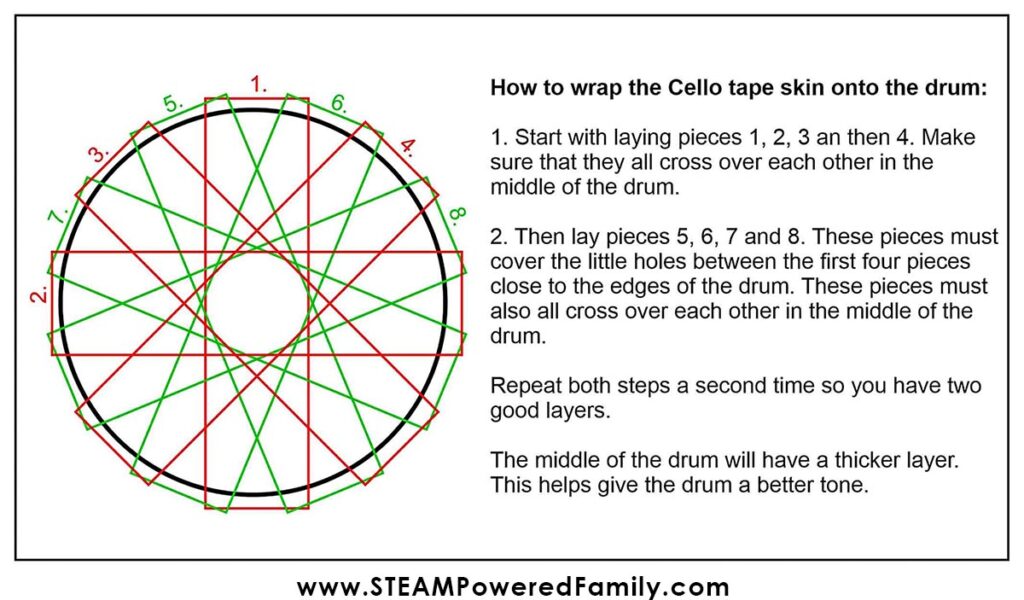 You should have eight pieces of tape across the top of the drum (in the first round of tape). Repeat the round to give you a total of 16 pieces of tape. NOTE: If you have a smaller cardboard tube, you may find you need less tape, or more narrow tape. Play with it to find the perfect ratio for your drum design and size. Turn the drum upside down and using your hand or fist, push down on the tape so that all the pieces stick together. Use the handles of the scissors to flatten all the tape around the sides of the drum. Decorate the Drum Now it’s time to decorate your drum. You can paint it, use stickers, create a design on the computer and print it out and glue it on (like we did), use different coloured/patterned tapes, whatever creative way you want to make your drum unique is perfect! Using duct tape or electrical tape, wrap the top and bottom of the drum to secure the cello tape down. Making the Drumsticks Cut the cork in half using a craft knife. Find the middle point of both pieces and push the wooden skewers into each cork piece until you can feel the point almost come out of the opposite ends. You may need a little force to do this. You can paint the drumsticks now if you wish to. Playing Your DIY Drum An African drum can be played using drumsticks or your hands. Remember to keep the bottom of the drum open, as this will give you the best quality of sound. |